Supplying Your Artwork
Guidelines
Regardless of the design software that you use to create your artwork, there are some requirements for producing your print ready file. The following will explain how to produce the document using the correct settings for best results.
File Size
The maximum file size that we accept on this website is 100 Mb, this should be enough for most products that we produce. If for any reason your file is larger than this, then please get in touch with our team on 0121 561 5020
Formats
We accept artwork in pretty much any format, but take care as each format comes with its own requirements.
- PDF all PDF's must be supplied at 300dpi (exported as high resolution). Compression must be set to downsaampled to 300dpi. To ensure that your fonts are printed as expected, ensure that all your fonts are embedded.
- Illustrator all AI documents should have their images embedded within the file and fonts should all be converted to curves. Save this file as an EPS.
- Photoshop the file resolution should be set 300dpi when first creating the document. You should export this as a TIFF or JPEG. If we are required to make changes to the supplied file you must provide us the PSD, AI or PDF.
- Indesign you must make sure that all fonts and images that you have used within your design are suuplied to us in a separate folder, making use of the package function within Indesign.
- Office Documents this style is not designed to provide print ready artwork in a professional environment. As a last resort you may convert the document to a PDF but please double check the result for any changes in colour, text and position of elements.
If you are unsure where to start please have a look at our print templates where you can find templates for each of our products.
What is DPI in Print?
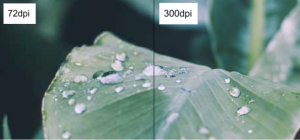
DPI or dots per inch is the measure of resolution. The higher the dpi the higher the resolution of the image / printed product. The higher the dpi the sharper the image will be. This is because a higher dpi or higher resolution image provides our printers with more information. If you are looking to capture fine detail a higher resolution is needed.
On the other hand a lower DPI will produce a lower quality print. You can print a low DPI image on some of the best printers however you will still get a low resolution image as the printer doesn’t have enough raw data to produce a high-quality image. As you can see in the image below this causes blurred edges and a loss of definition to all aspects of the image compared to a higher dpi.
DPI is comparable to the quality of video, if you watch a video at 1080p you are going to get HD quality, whereas if you were to watch the same video at 360p you would lose a lot of the detail.

Colour - RGB & CMYK
When you are creating your artwork please make sure you are working in CMYK. If you are working with the Adobe Suite (AI, Ps, Id) you can check this by going to file, document colour mode and making sure CMYK is checked.
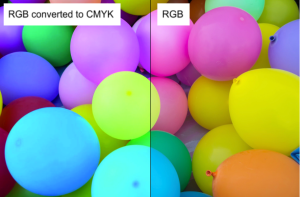
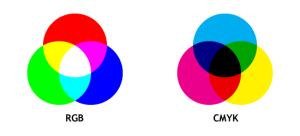
What does CMYK mean? Process colours are referred to as CMYK; Cyan, Magenta, Yellow and Black. These four colours are then used to reproduce your image on our printing press. Please note, if we receive a RGB file we will automatically convert the file to CMYK in order to print. During this process we cannot guarantee that the colours will match (see example below).


Trimming
- Bleed Ensure that you include a minimum of a 3mm bleed around your design to ensure that the colour reaches the edge when trimming.
- Crop Marks are not required if you have correctly set the bleed, but if you do place these they can help us align your artwork.

Multi-page Designs
If you have a multipage design we recommend supplying your artwork as a single PDF with the pages in order of printing. If providing mutliple documents please name the files with the page number in the filename.
If you have chosen a radius or custom cut for your artwork you will need to include a cut path. We have created a step by step guide to adding a cut path below. If you need support with these steps please contact us - our studio team will be happy to help.
Cut Paths (click here for an in-depth guide)
- Create a new layer and name it ‘cut’.
- Duplicate the artwork layer onto the cut layer.
- Lock your artwork layer at this point to protect this from being edited.
- Click the square next to the layer name in the layer palette to select everything on the layer, then click ‘unite’ on the pathfinder palette.
- Apply a stroke, this can be any colour, rename your stroke path swatch to ‘cutter’.
- Do this by double clicking the swatch then renaming under ‘swatch name’ making sure colour type is set to ‘process colour’.
- Remove fill from your cut layer.
- Save / Export your Illustrator as a pdf with trim marks and 3mm of bleed.
